There are three ways to get listing photos in 2026: shoot them yourself with a DSLR, shoot them yourself with an iPhone, or hire a real estate photographer for $150-$400 a listing. This guide covers all three — plus the AI editing layer that goes on top of any of them. Whether you’re learning how to take real estate photos for your first listing, figuring out how to take real estate photos with iphone because you don’t want to invest in gear yet, or just want to know how to edit real estate photos so the ones you already have look like a pro shot them, you’ll leave with a working playbook.
The honest truth is that the gear gap between an iPhone 15 Pro and an entry-level mirrorless camera has narrowed more than most agents realize. A well-shot iPhone photo + AI editing routinely beats a poorly-shot DSLR photo on the MLS, and listings care about how the final image looks, not which sensor captured it. We’ll cover what each path is genuinely good at, where each one fails, and the post-processing pass that ties them together.
We’re writing this for working agents and DIY home sellers — not for full-time real estate photographers, who already know most of this. If you’ve never picked up a tripod for an interior shot, start at the 6-shot template below. If you already shoot listings and just want the editing checklist, skip to Path C. We won’t fabricate “85% of buyers start online” stats — where we cite numbers, they’re either from sourced industry surveys or framed as photographer experience.
The 6-shot listing photo template
Every listing needs the same minimum visual coverage. Inconsistency is what makes some MLS listings look amateur and others look like brands. Use the six shots below as your floor — anything fewer and the listing looks half-shot; anything more is a bonus.
- Exterior front-on — the hero. Shot square-on to the front of the home, no parked cars in frame, no trash cans, no hose left on the lawn. Time of day matters: late afternoon side-light flatters most facades; harsh midday overhead light flattens them.
- Exterior wide angle — a 3/4 angle of the home that shows depth, the lot, and one side elevation. Stand back further than you think; cropping in is free, recovering missing context is not.
- Kitchen wide — the highest-impact interior. Shoot from the doorway or far corner so you capture the island, range, and at least one window. Counters cleared, no dish soap, no fridge magnets.
- Primary bedroom wide — bed made tight, decorative pillows on, all closet doors closed, all lights on. Stand at a corner facing a 2-wall view, not flat against one wall.
- Primary bath wide — toilet seat down, towels folded or removed entirely, no toothbrushes, no bath mats unless freshly cleaned. Mirror angles matter — reposition so you (and the camera) don’t appear in reflections.
- Living / main room wide — the social heart of the home. Capture the seating arrangement plus a window to anchor the light source.
Optional additions that earn their place on $500K+ listings: drone exterior (see drone video for real estate for the full aerial brief), backyard / pool / patio, twilight exterior, dining room, home office, garage if oversized, and detail shots of any standout feature (fireplace, custom millwork, range hood, view).
Three compositional rules apply across every shot:
- Stand back from the corner. Two-wall room views look bigger than one-wall room views — full stop. If you’re flat against a wall shooting toward the opposite wall, you’re cutting the perceived size of the room in half.
- Shoot from chest height, not eye height. Eye-level interior photos feel cramped because they raise the apparent floor and lower the apparent ceiling. Drop the tripod to roughly 4-4.5 ft and the room instantly feels taller and more spacious. This single adjustment is the biggest free upgrade most beginners get.
- Keep verticals straight. Doorframes, window edges, and the corner where two walls meet must be perfectly vertical in the final image. Tilted verticals scream “amateur” louder than any other single mistake. Use a tripod with a bubble level, or correct in post.
Include a foreground anchor where you can — the corner of a sofa, the edge of a kitchen island, a rug — to give the photo depth. A flat, anchorless interior shot looks like a real-estate listing from 2008.
For an end-to-end beginner walkthrough that ties prep, settings, and composition into one workflow — Serge Ramelli’s tutorial is one of the cleanest free versions available:
Path A: How to take real estate photos with a DSLR
If you’ve decided to invest in dedicated gear, the brief is narrow and the spend is reasonable. Real estate photography doesn’t need 8K video, 30fps burst, or sports-tier autofocus tracking. It needs a wide lens, clean low-light performance, and a tripod. For the full kit conversation — bodies, lenses, lighting, drones, 360 rigs — see our equipment for real estate photography breakdown.
Camera and lens. A full-frame mirrorless body in the $1,500-$2,000 range — Sony A7C II, Sony A7 IV, Canon EOS R8 — paired with a 16-35mm wide-angle zoom is the working agent’s standard kit. The wide end of the zoom is non-negotiable: 16mm full-frame equivalent is what makes small bedrooms and bathrooms look spacious without bending into fish-eye territory. If you want the deep-dive comparison on bodies, our breakdown of the best camera for real estate video covers the same five cameras that work equally well for stills.
The settings cheat sheet for interior real estate photography:
- Aperture: f/8. Sharp from foreground to back wall, no focus-falloff. f/4 is too shallow; f/16 starts to soften from diffraction.
- ISO: 100-400. Keep ISO low to keep noise out of shadows. The tripod is what makes this possible — at f/8 indoors you’ll need shutter speeds of 1/4s to 1s, which is unshootable handheld.
- Shutter: whatever it needs to be. With ISO and aperture locked, you let shutter speed compensate. 1/4s through 2s is normal for interiors. The tripod handles the rest.
- White balance: locked manually, not auto. Shoot a custom white balance off a white card or use the “incandescent” / “daylight” preset that matches the room’s dominant light. Auto WB drifts between rooms and creates the orange-bedroom-then-blue-kitchen problem in editing.
- Format: RAW. Always. Editing latitude on RAW files is the difference between recovering a blown-out window and re-shooting the listing.
- Focal length: 16-24mm full-frame. Wider than 16mm and walls bow; narrower than 24mm and the room looks claustrophobic.
Lighting. The single biggest lighting decision is whether to use flash. The honest answer for most agents: don’t, unless you’ve trained on flash-balanced HDR. Natural light through windows + every interior light turned on is the simpler, more forgiving setup. Mid-morning interiors (9-11 AM) and late-afternoon interiors (3-5 PM) both work; midday often pushes window highlights past recoverable. Turn on every lamp, every overhead, every under-cabinet light — yes, even ones that “don’t matter.” Warmth in lamps reads as comfort.
Tripod use is mandatory for interiors. Handheld interior photography at f/8, ISO 100 produces soft, motion-blurred shots. A $90 Manfrotto Befree or similar carbon-fiber tripod is the single most useful $90 you’ll spend. Set it to 4-4.5 ft, use the bubble level, and shoot with a 2-second timer or a remote release to avoid shutter shake.
Bracketing for HDR. For rooms with bright windows, set the camera to manual mode and bracket 3-5 exposures at +/- 2 EV. The dark frames preserve window detail; the bright frames preserve shadow detail. You’ll merge them in Lightroom, Photomatix, or directly in the camera. Bracketing without a tripod is impossible — the frames won’t align — which is one more reason the tripod isn’t optional. Our deeper real estate HDR photography guide covers bracketing settings by room type and the five mistakes that ruin merged shots.
One specific compositional tip that separates beginners from working real estate photographers: at the room corner, rotate the camera until you’re facing a 2-wall view (you can see two walls converging into the corner away from you), not a 1-wall view. The 2-wall composition captures roughly twice the perceived volume of the room in the same frame.
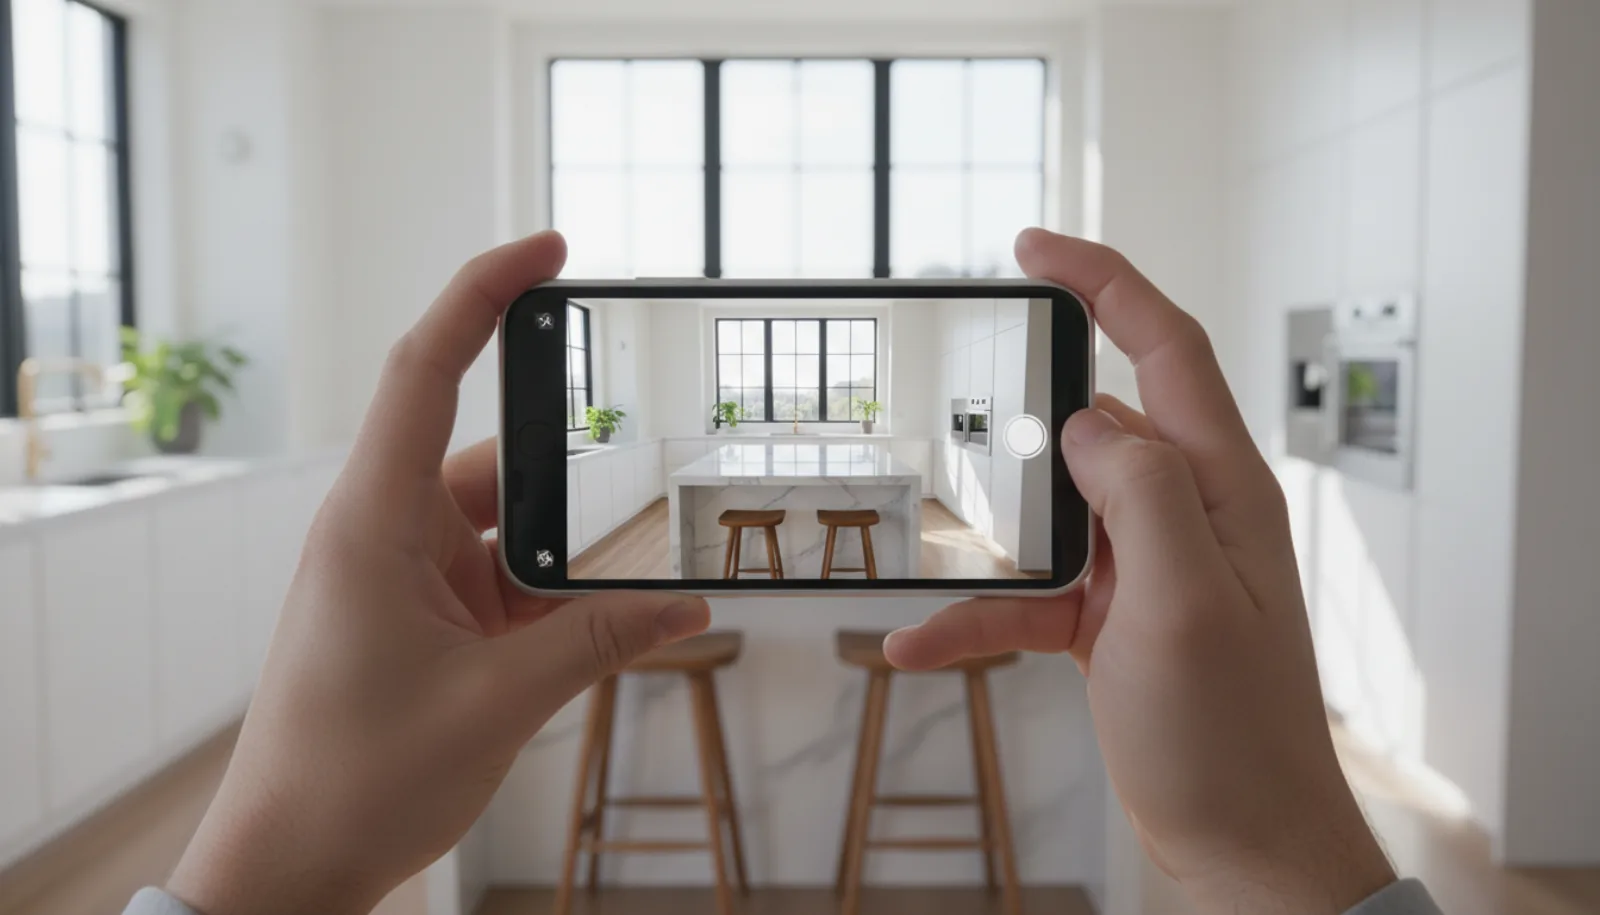
Path B: How to take real estate photos with an iPhone
Phones are now the most common real estate camera — not because they’re better, but because nine out of ten agents already own one and the marginal cost of using it is zero. The iPhone 15 Pro and newer (and similarly equipped Android flagships) shoot 48MP HEIF stills with computational HDR that handles bright-window interiors better than most $1,500 mirrorless cameras handle them straight out of camera. Used well, an iPhone is genuinely good enough for the bottom 80% of listings.
The iPhone settings checklist:
- Format: HEIF, on. Settings → Camera → Formats → “High Efficiency”. Half the file size, same quality, and you’ll keep more editing latitude than JPEG offers.
- Smart HDR: on. Settings → Camera → Smart HDR. The phone shoots and merges multi-exposure frames automatically — the iPhone equivalent of the bracketing you’d do manually on a DSLR.
- Grid: on. Settings → Camera → Grid. The 3×3 overlay helps you keep verticals straight without thinking.
- Lock exposure with long-press. Long-press anywhere in the viewfinder to lock focus and exposure (AE/AF Lock). Slide the little sun icon up or down to dial brightness. This is how you stop the phone auto-blowing-out a window.
- Use 1× or 2x, not 0.5x for hero shots. The 1× and 2× cameras have higher-quality sensors than the 0.5× ultra-wide. Save the 0.5× for tight bathrooms and small bedrooms where you can’t physically step back.
On the 0.5× ultra-wide. The ultra-wide is genuinely useful for small rooms — a powder room, a galley kitchen, a closet — where you’d otherwise need a 14mm lens. But it distorts heavily at the edges: faces stretch, walls bow, and a kitchen island in the foreground becomes the size of a car. Use the 0.5× when you need it for coverage, then crop the distorted edges in post.
The single biggest iPhone quality unlock is a $30 tripod. Without one, every iPhone interior shot is shaky at the shutter speeds the phone selects in low light. With one, the phone goes from “snapshot quality” to “honestly hard to tell from a mirrorless camera at small sizes”. Pair it with the iPhone’s built-in 3-second timer and you’ve solved 90% of the sharpness gap.
Apps worth installing:
- Halide ($60 one-time) — manual control over RAW capture, exposure, focus. Useful when Smart HDR misjudges a scene.
- Adobe Lightroom Mobile (free with Adobe ID; $10/mo for cloud sync) — full RAW editing on the phone, with the desktop Lightroom feature set.
- ProCamera ($15 one-time) — manual exposure, RAW, level-meter overlay for keeping verticals straight.
- Snapseed (free, Google) — surprisingly good free editor, “Selective” tool is excellent for brightening dim corners without blowing out windows.
When iPhone is good enough vs when DSLR is needed. Below ~$750K listing price, an iPhone shot well + AI editing produces MLS photos that are indistinguishable from professional work to 95% of buyers scrolling Zillow on a phone. Above $1M, on luxury listings where the marketing is part of the differentiation, hire a real estate photographer. The honest truth most camera-review blogs won’t tell you: a well-shot iPhone photo edited carefully beats a poorly-shot full-frame photo dumped onto the MLS untouched, every time. The skill of the operator and the editing pass matter more than the sensor.
What “an iPhone shot well” actually looks like — landscape, two-wall framing, natural light through the window:
For the iPhone-only path specifically — settings, framing, and the Cinema-mode tricks that make phone photography hold up against DSLR work — Cory Malveaux’s iPhone property tour walkthrough is the most practical free version:
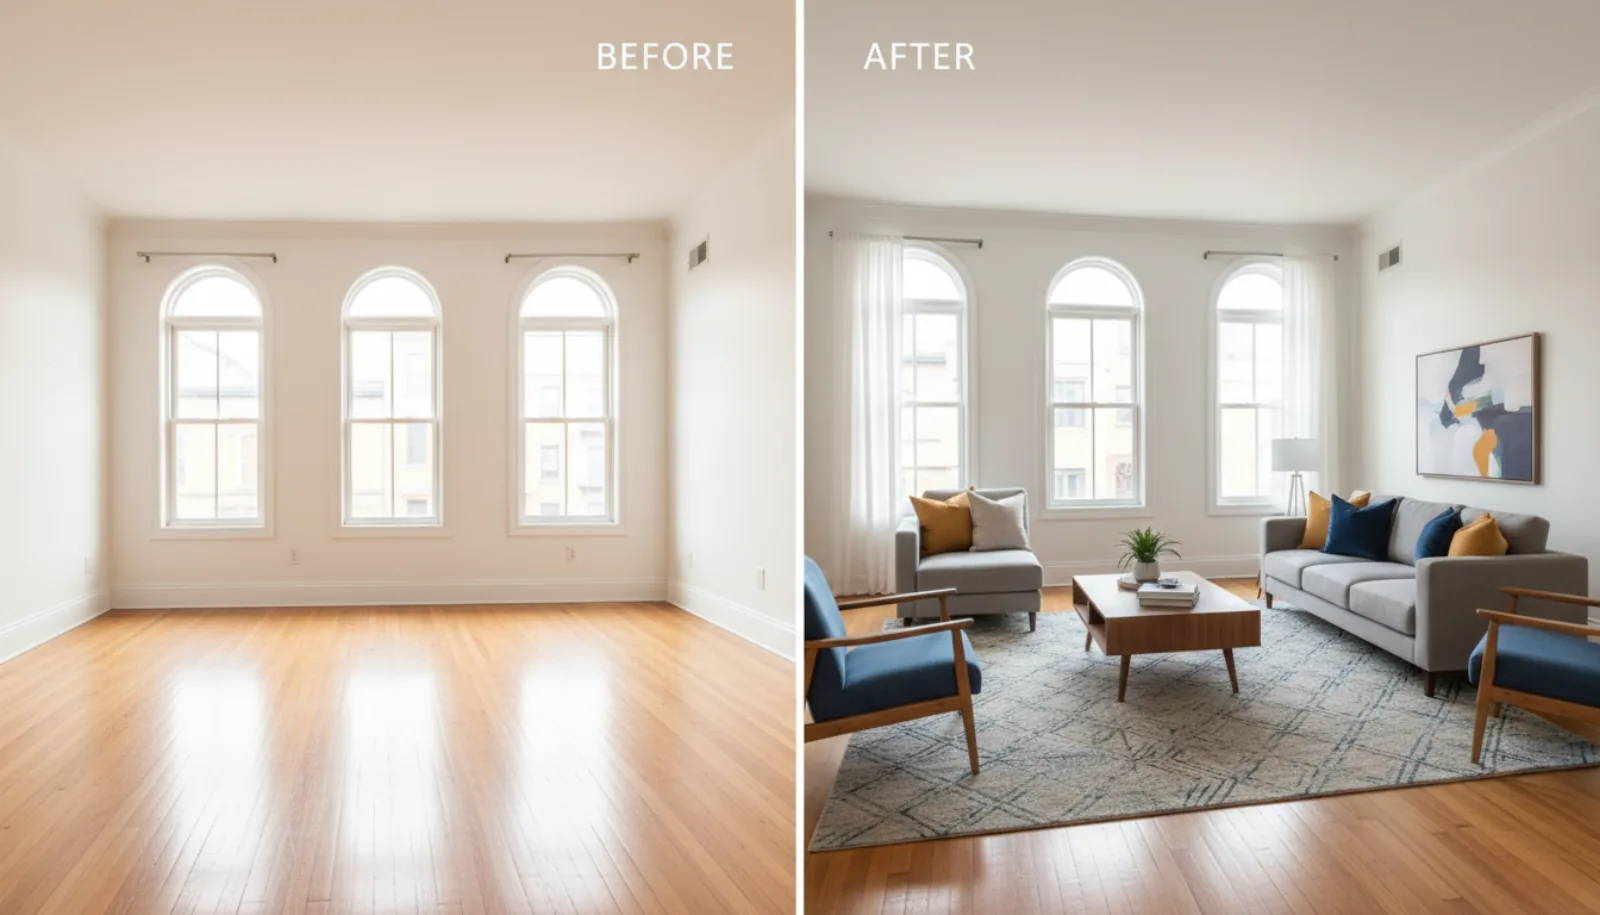
Path C: How to edit real estate photos
This is where most amateur listings die. Unedited photos straight off any camera — phone or DSLR — look flat: bright windows blow out, corners drop into shadow, wall colors drift between rooms, and lawns look brown in February. Editing is not optional; it’s the production step that closes the gap between “shot it yourself” and “looks pro.”
The editing checklist works in seven steps. Apply them in order, every photo, every listing.
- Lens correction. Auto-apply the correction profile for your lens (Lightroom does this automatically when you check “Enable Profile Corrections”). Removes the barrel distortion that bows wide-angle shots.
- Perspective correction. Auto or guided “Vertical” upright correction. Walls become vertical, floors flat, doorways rectangular. This single click fixes the tilted-vertical problem on 80% of shots.
- Exposure recovery. Lift shadows, drop highlights, recover blown windows. Aim for “I can see detail in both the brightest window pane and the darkest corner of the room.” This is what HDR bracketing was for; if you didn’t bracket, push shadow/highlight sliders aggressively before noise sets in.
- White balance. Lock to a consistent temperature across all photos in the same listing. A common tactic: pick the white balance off the kitchen counter (assume it’s neutral) and copy that WB to every other interior photo. Stops the orange-bedroom / blue-kitchen drift.
- Sky enhancement. For exterior shots, replace or enhance gray skies with natural blue. Photoshop’s Sky Replacement is the gold standard; AI sky replacement in Luminar or BrightShot is one click.
- Lawn enhancement. A brown winter lawn becomes green; bare patches fill in. This is purely cosmetic; ethical norms vary by MLS — disclosure usually isn’t required for color correction, but full re-landscaping (different plants, hardscape changes) crosses into misrepresentation. Our AI lawn replacement walkthrough shows the manual-vs-AI approach side by side.
- Declutter / virtual staging. Remove personal items, furniture you can’t physically move, exposed wires, kid’s toys. For empty rooms, virtual furniture placement turns a blank box into a livable space — this is where AI editing pulls ahead. See our guide to virtual staging for realtors for the full breakdown of when and how.
Software comparison:
| Tool | Cost | Best for |
|---|---|---|
| Adobe Lightroom Classic | ~$10/mo | The default for manual real estate editors. Best RAW workflow, batch processing, library management. |
| Adobe Photoshop | ~$21/mo | Sky replacement, advanced retouching, object removal, compositing. Used alongside Lightroom, not instead. |
| Snapseed | Free | Mobile-first editor, surprisingly capable Selective tool, no subscription. |
| Photoscape X | Free / $40 pro | Free desktop editor for Windows/Mac; viable Lightroom alternative for occasional shooters. |
| GIMP | Free | Open-source Photoshop alternative. Steep UI, but free. |
| BrightShot | Free tier + paid | One-click AI editing pass — perspective, exposure, sky, lawn, declutter, virtual staging. Built for listing photos specifically. |
| BoxBrownie | $1.60-$3 / photo | Pay-per-image manual retouching by a human team in 24 hours. Best for occasional users. |
| Spotless Agency | Subscription | Outsourced editing pipeline used by larger teams. |
The honest framing: a skilled editor with Lightroom + Photoshop and 15 minutes per photo will still beat a one-click AI pass on a luxury listing where every detail matters. AI’s advantage is volume and consistency — 30 photos edited in 90 seconds, looking identical to each other, ready for the MLS. For the 80% of listings where you’re shipping the asset stack on a Tuesday afternoon, that tradeoff is the right one.
Edit a full listing in 90 seconds. BrightShot’s AI real estate photo enhancement runs perspective correction, exposure recovery, white balance, sky and lawn enhancement, and decluttering on every photo in your listing — in one batch upload. Pair it with virtual staging for empty rooms. Try It Free →
Common real estate photo mistakes
Eight patterns we see kill otherwise-decent listing photos. None of them require new gear to fix.
- Shooting at eye level. The most common beginner mistake. Eye-height makes ceilings look low and floors look high. Drop to chest height (4-4.5 ft) for every interior.
- Camera flash pointed at windows. Direct on-camera flash bounces off window glass and creates a starburst that nukes the highlight you were trying to capture. If you must use flash, bounce off the ceiling or use off-camera fill aimed at a wall.
- Wide-angle distortion at room edges. A 16mm or 0.5× shot from too close to a kitchen island makes the island look the size of a small car. Step back, or accept that the wide-angle lens has a 24-28mm “honest range” before edge distortion takes over.
- Inconsistent white balance across rooms. The orange-bedroom-then-blue-kitchen problem. Lock white balance manually or copy a single WB across every interior photo in post.
- Personal items left in frame. Family photos, kids’ artwork on the fridge, prescription bottles on the bathroom counter, the dog’s bed. Buyers can’t picture themselves in a home that’s still occupied by someone else’s identity.
- Cropping out the floor. Tilting the camera up to “fit more ceiling” hides the floor — and the floor is what conveys size. Keep at least 1-2 ft of floor visible at the bottom of every interior frame.
- Tilted verticals. Doorframes leaning, kitchen-island edges off-axis, walls converging toward the top. Use a tripod with a bubble level or fix in post with one-click vertical correction.
- Posting unedited photos on the MLS. The rawness shows. Even a 30-second pass through Lightroom (or one-click AI editing) closes the gap between “shot by the seller” and “shot for the listing.”
MLS / portal photo specs
Your photos will be displayed on Zillow, Realtor.com, your local MLS, your IDX site, and a dozen syndicated portals. Each has slightly different specs; meeting the strictest one means you’ll pass them all.
- Aspect ratio: 4:3 horizontal preferred. Both Zillow and Realtor.com display at 4:3, and the MLS expects horizontal. Vertical phone photos get letterboxed and look amateur. If you shoot vertical for social, also shoot horizontal for the MLS.
- Resolution: 1024×768 minimum, 2048×1536 recommended. Zillow accepts up to 1080p height; uploading larger gets downsampled. Going below 1024 wide produces visibly soft images on modern monitors.
- File size: under 10 MB per image. Most MLS systems cap at 10 MB; some at 5 MB. Export from Lightroom at 80% JPEG quality to stay well under.
- Maximum photos per listing. Zillow allows up to 100; Realtor.com up to 36; most local MLS systems cap at 30-50. Aim for 25-40 photos per listing — enough for full coverage, few enough to avoid showing every closet.
- EXIF data. Strip GPS coordinates and camera-serial EXIF before upload (Lightroom export has a “Remove Location Info” toggle). Some MLS systems do this automatically; don’t assume yours does.
- Filename hygiene. Use descriptive filenames (
123-main-st-kitchen.jpg), notIMG_4521.JPG. Helps with portal SEO and your own organization. - Cover photo selection. The first photo in your upload order is the listing thumbnail on Zillow and the MLS. Always lead with the strongest exterior or hero kitchen shot — never with a bathroom or hallway.
A good listing description amplifies the photos; a bad one undercuts them. Our free listing description generator builds the MLS copy in under a minute so you can focus the rest of your time on the visuals.
FAQ
What is the best camera for real estate photos?
For most agents in 2026, the Sony A7C II is the best camera for real estate photos and video — full-frame 33MP sensor, 7-stop in-body stabilization, compact body. Pair it with a Sony 16-35mm f/4 zoom for the wide end you need on interiors. Under $1,500, the Canon EOS R8 is the budget pick. For the full breakdown including budget options and the iPhone alternative, see our guide to the best camera for real estate video — the same cameras work equally well for stills. If you shoot fewer than ten listings a year, an iPhone 15 Pro plus a $30 tripod plus an AI editing pass is genuinely good enough — don’t over-invest in gear you’ll use twice a quarter.
Can you take real estate photos with an iPhone?
Yes — and for the bottom 80% of listings, the result is indistinguishable from a professional camera once edited. The iPhone 15 Pro and newer shoot 48MP HEIF stills with Smart HDR that handles bright windows surprisingly well. The two changes that take iPhone real estate photos from “snapshot” to “MLS-ready” are a $30 tripod (eliminates motion blur at the slow shutter speeds the phone picks indoors) and an editing pass (Lightroom Mobile, Snapseed, or AI). For luxury listings above $1M where photography is part of the differentiation, hire a professional real estate photographer — the gap there is still meaningful. Below that, an iPhone is the practical choice.
What is the 3-3-3 rule in real estate photography?
The 3-3-3 rule is a marketing cadence rule: take 3 strong photos, post them across 3 channels (MLS, Instagram, email), within 3 days of the listing going live. The point is to avoid the trap of waiting until the photo set is “perfect” before shipping anything. New buyers are searching for listings within 24-72 hours of activation; a partial photo set posted fast beats a complete set posted on day seven. The 3-3-3 rule is a reminder that listing marketing rewards speed, not perfection. Some photographers also use “3-3-3” to mean three exposures bracketed at three EV stops over three rooms as a setup test — context matters when you hear the phrase.
How many photos should a real estate listing have?
25-40 photos is the working sweet spot for most listings. Below 20, the listing feels under-shot — buyers assume something’s hidden. Above 50, you’re showing every closet and the listing starts to feel padded. Industry data from listing portals suggests dwell time peaks around 30 photos per listing and falls off above 60. For a standard 3-bedroom home, 25-35 covers exterior front, exterior 3/4, kitchen, all bedrooms, all bathrooms, living, dining, backyard, and 3-5 detail or feature shots. Luxury listings with multiple living spaces, pools, or unique architecture justify more — up to 50-60 — but those are the exception, not the norm.
What’s the best app to edit real estate photos on iPhone?
For free, Snapseed is the best app to edit real estate photos on iPhone — the Selective tool brightens dim corners without blowing out windows, perspective correction is one tap, and there’s no subscription. For paid, Adobe Lightroom Mobile ($10/mo) gives you the full Lightroom feature set with cloud sync to desktop, which matters if you also edit on a laptop. For one-tap AI editing — perspective, exposure, sky, lawn, declutter — BrightShot runs a real-estate-specific pass that takes 90 seconds for a full listing and ships output you can upload straight to the MLS. Most working agents end up using Snapseed for fast fixes, Lightroom for serious edits, and an AI tool for batch volume on listing day.