When you’re starting out in real estate photography, the sheer number of camera settings can feel overwhelming. But here’s the secret: getting consistently professional results boils down to a simple, repeatable formula.
It all begins with taking control and switching your camera to Manual Mode. We’ll start with an aperture of f/8, drop the ISO to its lowest native setting (usually 100-200), and then dial in the shutter speed until the exposure looks right. This is the bedrock combination for creating sharp, clear, and compelling property photos.
The Foundation for Flawless Real Estate Photos
To really make your images stand out, you have to leave the “auto” settings behind. Manual mode is your best friend on a real estate shoot because it gives you absolute consistency from one shot to the next. This is a game-changer during the editing phase, especially when you’re blending multiple exposures.
The key is getting comfortable with the “exposure triangle”—the constant dance between aperture, ISO, and shutter speed. Adjust one, and you’ll likely need to tweak another to keep the exposure balanced. It’s this hands-on control that elevates a simple snapshot into a professional photograph that truly sells a space.
Nailing the Exposure Triangle for Interiors
When shooting indoors, the main goal is to get everything in focus, from the chair right in front of you to the artwork on the far wall. This calls for a deep depth of field, which is all about your aperture.
For most interior work, f/8 is the magic number. I’ve found it’s the sweet spot that keeps both the foreground and background details tack-sharp without introducing softness. In some situations, you might push it to f/9 or f/11 if a room is particularly deep, but f/8 is the perfect starting point.
After you’ve set your aperture, lock in your ISO. To get the cleanest, most professional-looking images, you want to eliminate digital noise. The easiest way to do that is to stick to your camera’s lowest native ISO, which is almost always ISO 100 or ISO 200. You might be tempted to crank it up in a dark room, but since you’re using a tripod, there’s no need. A higher ISO only hurts your image quality.
This simple, three-step process is what I follow for every single room I shoot: nail the aperture first, then the ISO, and finally, adjust the shutter speed for the exposure.

This sequence forces you to prioritize what matters most—sharpness and quality—and lets the shutter speed handle the brightness.
For a quick reference, here are the go-to settings I recommend starting with for any interior shoot.
Recommended Starting Camera Settings for Interiors
| Setting | Recommended Value | Why It Matters |
|---|---|---|
| Mode | Manual (M) | Gives you full control and ensures shot-to-shot consistency for easier editing. |
| Aperture | f/8 | Provides a deep depth of field, keeping the entire room sharp from front to back. |
| ISO | 100 (or lowest) | Minimizes digital noise, resulting in the cleanest and highest-quality images. |
| Focus | Manual or Single-Point | Ensures your focus is exactly where you want it, typically one-third into the room. |
| File Format | RAW | Captures the maximum amount of image data for flexibility in post-production. |
These settings are your launchpad. You’ll find they work beautifully for about 90% of interior situations, with only minor tweaks needed from there.
Why Bracketing Is a Non-Negotiable Technique
With your aperture and ISO dialed in, your shutter speed is the last variable. It’s going to change depending on how bright or dark each room is. But here’s the problem: a single photo rarely captures the full dynamic range of a room. You’ll have bright, blown-out windows and deep, crushed shadows all in one scene.
This is where bracketing becomes your superpower. Your camera’s Auto Exposure Bracketing (AEB) setting takes a series of photos—usually three or five—at different shutter speeds: one metered “correctly,” one darker, and one brighter.
By shooting a bracketed set, you capture all the light information in the scene. This gives you everything you need to blend them together later and create a final image that looks perfectly and naturally lit. It’s not a trick; it’s standard practice for virtually every professional real estate photographer out there. Mastering this technique, along with knowing how to improve the lighting of any room, will make your on-site workflow faster and your final images dramatically better.
Choosing the Right Gear for Interiors and Exteriors
Getting your camera settings right is a huge part of the puzzle, but your gear is what truly brings a shot to life. The camera body is important, of course, but it’s the equipment you pair with it that separates an amateur snapshot from a professional, polished image that sells homes.
The first thing you absolutely need—right after the camera itself—is a sturdy tripod. Seriously, don’t skimp here. This isn’t just about preventing a shaky shot; it’s the secret to getting the absolute best image quality your camera can produce. A solid tripod lets you lock in a low ISO and use slower shutter speeds without a hint of motion blur, giving you incredibly crisp, clean photos every time.
It’s also completely non-negotiable if you plan on bracketing your shots. The tripod ensures every frame is perfectly aligned, which is critical for merging them later. Even a tiny bit of movement between those exposures will create a blurry, unusable mess in post-production.

Lenses and Essential Accessories
When it comes to lenses, a wide-angle zoom is the workhorse of real estate photography for good reason. For a full-frame camera, something in the 16-24mm range is the sweet spot. It’s wide enough to capture the full sense of a room, making it feel spacious and welcoming, but it avoids that weird, distorted “fisheye” look that anything wider can create.
Here’s a little trick I swear by for getting maximum sharpness: I never touch the shutter button. Instead, I use my camera’s built-in 2-second timer or a cheap remote shutter. This simple habit completely eliminates the tiny vibration from pressing the button, keeping every last detail tack-sharp.
Once you step outside, your approach needs to shift just a bit. Bright sun often means dealing with nasty glare from windows, pools, or even glossy exterior paint. This is where a circular polarizing filter (CPL) becomes your best friend. Just by rotating the filter, you can slice right through that glare, which instantly makes skies a deeper blue and foliage look far more lush and vibrant. Think of it as a pair of high-quality sunglasses for your lens.
For those taking their shoots to the next level, our guide to real estate drone photography applies many of these same principles to capturing a property from the air. Combining stunning ground-level shots with a few dramatic aerials creates an unbeatable marketing package for any listing.
Nailing Dynamic Range and Color
Once you’ve got the basic settings locked in, it’s time to elevate your shots from good to great. This is where we tackle the two biggest headaches in real estate photography: handling rooms with wildly different light levels and getting the colors to look just right.
The classic problem? A beautiful living room with a big, bright window. If you expose for the room, the window view blows out to a white rectangle. If you expose for the view, the room turns into a dark cave. Neither works. This is where bracketing becomes your best friend.

Bracketing for Those Tricky High-Contrast Scenes
Most modern DSLRs and mirrorless cameras have a feature called Auto Exposure Bracketing (AEB). Instead of taking one photo, it automatically fires off a quick series of shots at different brightness levels. I almost always use a 3 or 5-shot bracket to capture everything from the darkest shadows to the brightest highlights.
A typical 3-shot bracket gives you:
- One dark (underexposed) shot: This one saves all the detail in the bright window view outside.
- One “normal” (metered) shot: This captures the main part of the room correctly.
- One bright (overexposed) shot: This pulls out the detail hiding in dark corners, like under a coffee table.
Later, these images are blended together in post-production to create one perfectly exposed photo. Suddenly, you can see the gorgeous landscaping outside and the beautiful hardwood floors inside. My go-to setting is a +/- 2 stop bracket; it’s the sweet spot for nearly any residential space.
Why You Absolutely Must Shoot in RAW
For bracketing to work its magic, you have to be shooting in RAW format. It’s non-negotiable. JPEGs might save you a little space on your memory card, but the camera has already made decisions for you—compressing the file and throwing away a ton of valuable image data.
Think of a RAW file as a digital negative. It holds all the pure, unprocessed data from your camera’s sensor. This gives you incredible flexibility to adjust exposure, pull back blown-out highlights, lift shadows, and fine-tune colors after the fact.
That extra data is everything. When you send bracketed RAW files to be edited, especially with modern AI-powered services, you’re giving the software the best possible ingredients to work with. Our guide on AI real estate photo editing dives deeper into how starting with high-quality RAW files leads to dramatically better final images.
Getting Perfect Color with a Custom White Balance
We’ve all seen photos where the walls look sickly yellow or have a weird blue tint. This happens because different light sources have different “color temperatures.” Daylight is cool and blueish, while standard light bulbs are warm and orange. Your camera’s Auto White Balance (AWB) takes a guess, but it’s often wrong.
To get consistently accurate color, you need to set a custom white balance. It sounds technical, but it’s actually pretty simple:
- Get a neutral grey card and place it in the room you’re about to shoot.
- Take a close-up photo of just the card, making sure it’s evenly lit.
- Go into your camera’s menu, find the custom white balance setting, and tell it to use the photo you just took as its reference point for “neutral.”
That’s it. Your camera now knows precisely what neutral grey looks like in that specific light, and every photo you take in that room will have perfectly true-to-life colors. It’s a small step that makes a huge professional difference.
Composing Your Shots for Maximum Impact
You can have the most technically perfect camera settings in the world, but they won’t save a bad composition. Once your gear is dialed in, your focus has to shift entirely to the art of framing. You’re not just taking a picture of a room; you’re creating an image that helps a potential buyer see themselves living there.
Your real work begins the second you step through the front door. Before I even think about unpacking my tripod, I do a quick walkthrough of the entire property. My mission? Find the best angles and mercilessly hunt down clutter. It only takes a minute to hide the TV remotes, tuck away a stack of mail, or clear off the kitchen counters, but the impact is enormous.
This initial pass is also where you start pre-visualizing your shots. I’m always looking for a room’s best features and thinking about how to frame them to create a real sense of space and flow.
Establish Your Perspective and Angles
After prepping the room, the single most important rule is to keep your camera level and at a consistent height. I almost always set my tripod to about 5 feet, or roughly chest height. This perspective just feels right to the human eye, and critically, it keeps all your vertical lines perfectly straight. The moment you tilt your camera up or down, the walls start to look like they’re caving in—it’s a dead giveaway of amateur work.
To make a room feel as big and inviting as possible, I head for the corners. Shooting from a corner looking back into the room is my go-to move. It opens up the floor plan and gives you a wide, welcoming perspective that can make even a small bedroom or office feel surprisingly spacious.
Think about how you can use the room’s layout to guide the viewer’s eye.
- Doorways are natural frames. Use them to create a layered shot that peeks into the next room, suggesting a natural flow.
- Let a kitchen island or a long hallway act as a leading line, pulling the viewer deeper into the home.
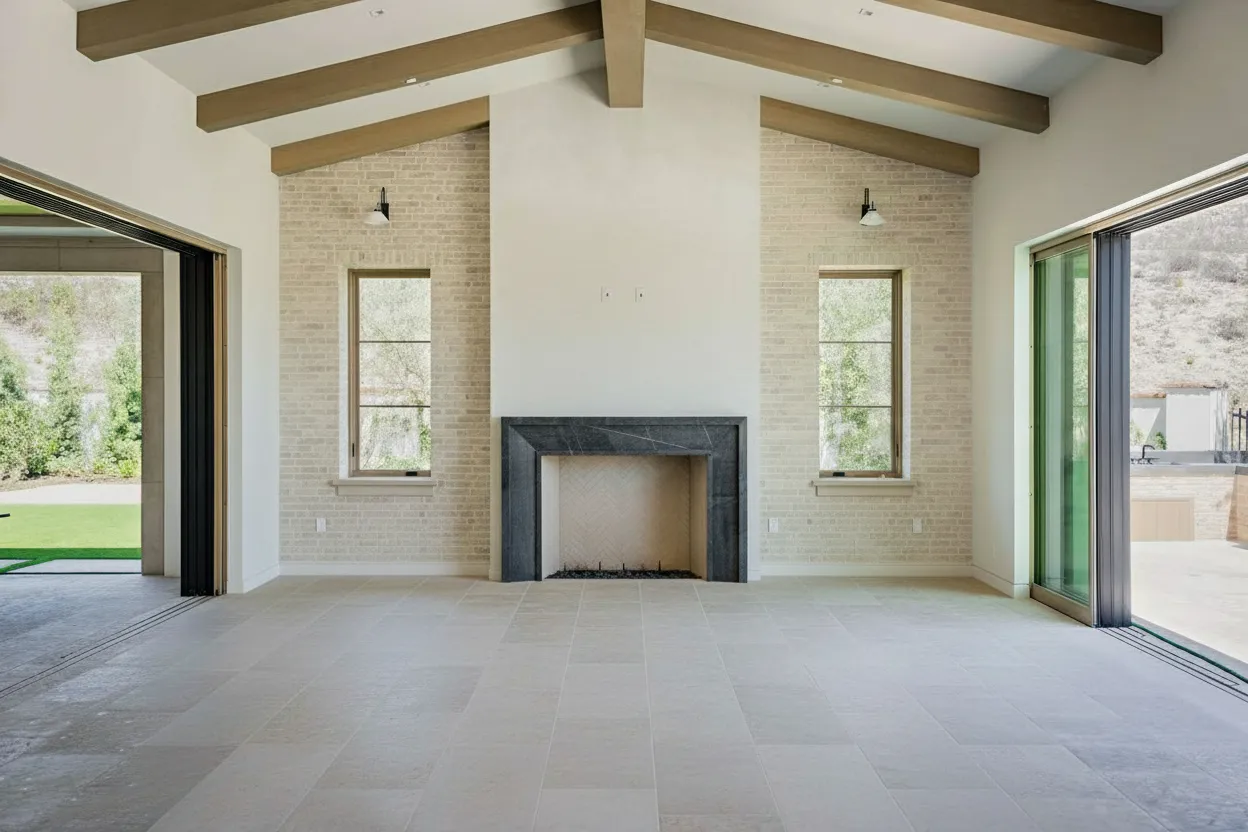
- Focus on one or two main walls. A straight-on, one-point perspective shot is perfect for highlighting a beautiful fireplace or a stunning feature wall.
Create a Repeatable On-Site Workflow
Having a system on-site is the key to working efficiently without ever missing a shot. After I’ve done my walkthrough and decluttering, I follow the same simple process for every single property.
First, I get my file naming straight. This might seem like a small detail, but it’s a lifesaver in post-production. I organize folders by room (“Living_Room,” “Kitchen,” “Master_Bedroom”) and name my files with the property address and a sequential number.
This isn’t just about being tidy. It’s about building a professional, repeatable system that lets you work quickly and with confidence. You spend less time fumbling with gear and more time focused on what actually sells the house: creating beautiful, compelling images.
Finally, I move methodically through the property, almost always starting at the front door and working my way through. In each room, I’ll grab the main wide shot from a corner, then look for one or two detail shots—things like unique light fixtures, beautiful tile work, or high-end appliances. This workflow guarantees I get full coverage and deliver a rich, complete set of photos for the listing.
From Camera to Client: Prepping Your Shots for AI Enhancement
You’ve done the hard work on site, and now it’s time to turn those carefully captured photos into stunning, listing-ready images. This is where the magic really happens, connecting your in-camera skill with the power of modern post-processing.
All that attention to detail—the bracketing, the RAW captures—isn’t just for old-school manual editing. In fact, it’s the ideal raw material for an AI enhancement engine. You’re handing over a complete data set, which allows the software to perform incredible feats like flawless window pulls and perfectly balanced lighting.

A Place for Everything: Organizing Files for a Flawless Handoff
I can’t stress this enough: a chaotic folder of images will only lead to headaches and subpar results. Before you even think about uploading, you need a system. A little bit of organization on the front end saves you a ton of frustration later.
My go-to method is simple. I create a main folder for the property (e.g., “123_Maple_St”), and inside that, I make subfolders for each room or area (“Living_Room,” “Kitchen,” “Master_Bedroom,” “Exterior_Front”). All the bracketed RAW files for a single shot go into the corresponding folder. It’s a clean, logical structure that ensures the AI knows exactly which images to blend together.
This is how a solid foundation in the field maximizes the power of today’s tools. Picture uploading a bracketed set from the living room and getting back a perfectly lit shot with crystal-clear window views in just a few moments. That’s the payoff.
This methodical prep work is the secret to a fast and efficient post-production workflow.
Why Your Work in the Field Matters for AI
It helps to think of an AI photo editor as a world-class retoucher who just happens to work at lightning speed. And just like any human expert, the AI needs quality materials to produce quality results. Your camera settings have a direct impact on how well it can do its job.
Here’s a breakdown of what really moves the needle:
- Bracketing Is All About Data: That 3 or 5-shot bracket isn’t overkill; it’s essential information. The AI will grab the crisp details from the dark exposure for the window view, lift the shadows using the bright exposure, and use the middle shot for everything in between. It’s the key to a natural-looking HDR blend.
- RAW Files Give Maximum Wiggle Room: JPEGs throw away a ton of image data to save space. Shooting in RAW preserves everything, giving the AI total flexibility to adjust colors, fine-tune white balance, and push exposure without the image falling apart.
- A Low ISO Means a Clean Canvas: Starting with a clean, noise-free image from a low ISO setting gives the AI a perfect starting point. Instead of wasting processing power trying to clean up digital grain, it can focus entirely on enhancing the light, color, and detail.
When you nail the capture on-site, you’re not just taking a picture; you’re setting the stage for the technology to shine. This partnership between photographer and AI is what produces those magazine-quality images that stop scrollers in their tracks and help sell homes faster.
And the tech doesn’t stop at lighting. For those shots where you couldn’t move everything, find out how AI can declutter photos to create that clean, minimalist look agents love.
Common Questions From the Field
Even when you’ve got your workflow dialed in, every property has a way of throwing a curveball at you. Knowing the right real estate photography camera settings is one thing, but knowing how to adapt them on the fly is what separates the pros.
Let’s walk through some of the most common questions and tricky situations that pop up on shoots. These are the real-world problems that can derail a session if you’re not ready for them.
How Do I Handle Mixed Lighting in One Room?
One of the biggest headaches you’ll face is a room with mixed lighting. I’m talking about those warm, yellow tungsten lamps fighting with the cool, blue daylight streaming in through a window. Your camera’s auto white balance just can’t make sense of it, leaving you with ugly color casts.
The simplest, most effective solution? Turn off every single artificial light. Just kill ‘em. This leaves you with only one light source—the natural light from outside—which creates a clean, consistent color temperature that’s a breeze to correct in post.
Of course, sometimes you need to leave the lights on for ambiance. If that’s the case:
- Shoot your brackets. This ensures you capture all the light information you need.
- Use a grey card. Pop a grey card in the scene for one reference shot. This gives you a perfect neutral target to click on later, making color correction so much faster.
A grey card is your best friend for color accuracy. By setting a custom white balance based on the card, you’re telling your camera exactly what “neutral” looks like in that specific, complicated lighting environment.
What’s the Best Way to Shoot a Tiny Bathroom?
Ah, the small bathroom. They are notoriously tough. The goal is to make the space feel as open and airy as possible without creating that warped, “funhouse mirror” look you get from an ultra-wide lens.
It all comes down to lens choice and camera placement. My rule of thumb is to avoid going any wider than 16mm on a full-frame camera. Push it any further and you’ll start stretching the corners, making the toilet or vanity look bizarrely huge.
Your best bet is to plant your tripod in the doorway and shoot back into the room. This vantage point usually gives you the widest perspective without forcing you to use an extreme focal length. Just make sure your camera is perfectly level so all the vertical lines stay straight.
Is Using a Flash Still Necessary with Bracketing?
This is a hot topic. With today’s powerful bracketing techniques and HDR software, a lot of photographers wonder if they still need to bother with flash (often called the “flambient” method). While bracketing alone can produce stunning, natural-looking images, flash definitely still has its place.
Using an off-camera flash can inject a pop of clean, crisp light, creating that bright, vibrant look some agents absolutely love. The trade-off is that it adds a layer of complexity and time to your shoot.
For most jobs, a well-shot 3 or 5-shot bracket gives you all the dynamic range you need for a beautiful, authentic-looking final image. It’s often faster and more forgiving than trying to perfectly balance flash and ambient light on site. Ultimately, it comes down to the style you or your client are after.