Truly great home interior pictures don’t just happen by chance. They’re the product of thoughtful planning and prep work long before you ever pick up a camera. The best photos feel intentional; they know exactly where to guide your eye and tell a story about the space that builds an immediate emotional connection. This foundation is what turns a simple snapshot into a seriously effective marketing tool.
Laying the Groundwork for Captivating Interior Shots

Before you even think about your camera settings, you need to walk the property with a photographer’s eye. Don’t just see rooms—see compositions. Move through the home just as a prospective buyer would, starting from the front door and making your way through every space.
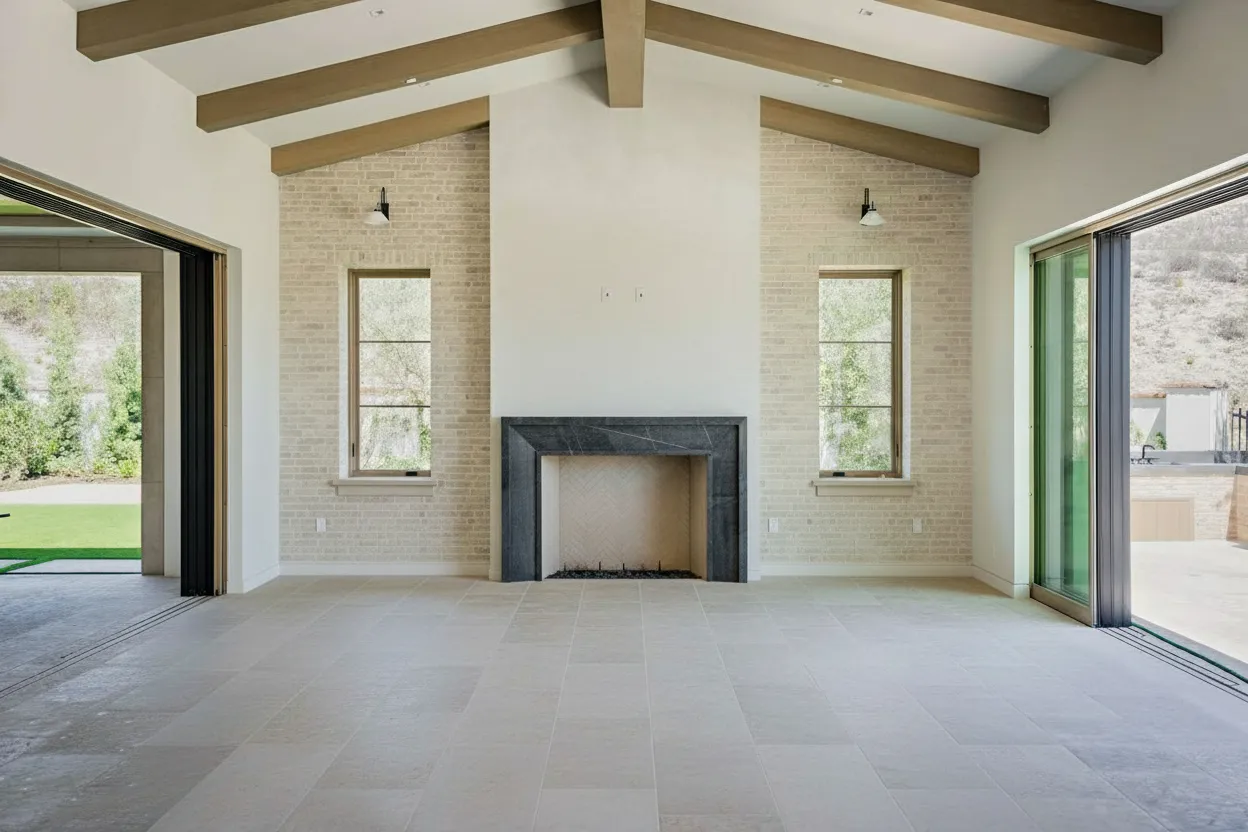
This initial tour is all about building a mental map. You’ll start to notice how the light changes from room to room and be able to pinpoint those money-making architectural details—like a stunning fireplace, dramatic vaulted ceilings, or custom built-ins. It’s also your first chance to play defense, spotting potential problems like a cluttered kitchen counter or a dark hallway that will definitely need some extra light.
Building a Narrative Through Your Shot List
With that mental map in place, it’s time to create a detailed shot list. This isn’t just a to-do list; it’s your storyboard. It’s how you plan the visual journey you want to take a potential buyer on, ensuring you hit every key selling point along the way.
A good shot list has a natural, logical flow. I usually structure mine like this:
- Establishing Shots: Start wide with the main living areas—the living room, kitchen, and dining room. These shots set the scene and show how the home flows.
- Detailed & Feature Shots: Now, zoom in. Get close-ups of the beautiful tile backsplash in the kitchen, the premium hardware on the cabinets, or that incredible view from the primary bedroom window.
- Transitional Shots: Don’t forget the hallways and entryways. These photos act as the connective tissue, guiding the viewer from one space to the next and making the layout feel intuitive.
- Private Spaces: Move on to the primary bedroom and its en-suite, followed by the secondary bedrooms, home office, or any other bonus rooms.
A shot list forces you to be deliberate. You’re not just documenting a room; you’re crafting an experience that makes someone feel like they’re right there, walking through the home themselves.
Decluttering for the Camera
What looks perfectly normal to the naked eye can feel chaotic and messy in a 2D photograph. The whole point of decluttering for photos isn’t just to be tidy—it’s to create intentional negative space. This visual breathing room is what allows a buyer’s eye to focus on the home itself, not the seller’s stuff.
Before any shooting begins, you have to be ruthless. Get rid of the personal items. Family photos, piles of mail, the kids’ art on the fridge, and yes, most of those countertop appliances have to go. The less personal clutter you have, the easier it is for buyers to mentally move their own belongings into the space.
The Art of Minimalist Staging
Once you’ve cleared the clutter, the next phase is what I call minimalist staging. This has nothing to do with bringing in truckloads of furniture. Instead, it’s about using a few well-placed items to hint at the room’s purpose and add a touch of aspirational style. Mastering this is a game-changer, and our in-depth guide on how to stage a home is a fantastic resource for diving deeper.
Think in small, curated scenes, or “vignettes.” A bowl of bright green apples on the kitchen island can add a perfect pop of color. A couple of stylish throw pillows and a neatly folded blanket can make a neutral sofa suddenly feel warm and inviting. The goal is to suggest a lifestyle, not scream it. Every single item you place should serve the composition, adding just enough warmth and context to your home interior pictures without creating new clutter.
Getting the Shot: Camera Techniques for Standout Interiors

Let’s clear the air on a common myth: you don’t need a truckload of expensive equipment to take incredible home interior pictures. While a high-end DSLR offers fantastic control, the powerful camera in your pocket is often more than enough to get the job done. The real secret isn’t the gear itself—it’s knowing how to use it.
Your goal here is to capture photos that are bright, sharp, and true to the space. Think straight vertical lines (no weird leaning walls!) and a balanced exposure that shows detail in both the bright window and the dark corners. Getting this right on-site gives you a perfect digital canvas for the editing stage.
Getting the Most from Your DSLR
If you’re using a DSLR, your first and most important step is to break free from “Auto” mode. It’s time to switch to Manual. This gives you direct control over the exposure triangle, the three settings that work together to define your photo’s brightness. Getting them to play nice is the key to professional interior shots.
-
ISO: This is your camera’s sensitivity to light. For clean, professional interiors, you want this as low as it can go—usually ISO 100 or 200. Pushing it higher introduces digital “noise” or grain, which instantly makes a photo feel amateur. A tripod is absolutely essential here, as it allows you to keep the ISO low even in dimly lit rooms.
-
Aperture: This setting (measured in f-stops like f/8) controls your depth of field, or how much of the scene is in focus. In real estate, you want everything sharp from the foreground to the background. An aperture between f/8 and f/11 is the sweet spot for getting that crisp, wall-to-wall focus.
-
Shutter Speed: This determines how long the camera’s shutter remains open. Because you’re using a low ISO and a mid-range aperture, you’ll need a slower shutter speed to gather enough light. This is exactly why a tripod is non-negotiable. The slightest movement during a slow exposure will turn your shot into a blurry mess.
A wide-angle lens, something in the 16-24mm range for a full-frame camera, is your best friend for interiors. It helps you capture the entire room without making it feel distorted. Pro tip: stand in a corner and shoot towards the heart of the room, always keeping the camera perfectly level. For a deeper dive on gear, our guide on choosing the best camera for real estate photography has you covered.
Your Smartphone Is a Secret Weapon
Today’s smartphones are absolute beasts when it comes to photography. With a couple of simple adjustments, you can produce images that seriously compete with dedicated cameras. The most important thing is to take back manual control.
Don’t just point and shoot. Take a moment to activate your phone’s gridlines. This simple overlay is the single most effective tool for ensuring your vertical and horizontal lines are perfectly straight, which is critical for professional-looking home interior pictures.
Many default camera apps have a “Pro” or “Manual” mode tucked away in the settings. If yours doesn’t, it’s worth spending a few dollars on a third-party app like Halide or ProCamera to unlock those controls.
Before diving into a comparison, it’s helpful to understand the core differences in approach. A DSLR gives you manual precision over each element, while a smartphone relies heavily on software to blend multiple exposures. Both can achieve fantastic results.
Here’s a quick-reference table to get you started with either device.
DSLR vs. Smartphone Camera Settings for Interiors
| Setting/Technique | DSLR Recommendation | Smartphone Recommendation |
|---|---|---|
| Mode | Manual (M) | Pro/Manual Mode, or use HDR |
| ISO | 100-200 (as low as possible) | 50-100 (lowest available) |
| Aperture | f/8 - f/11 | Fixed; not adjustable |
| Shutter Speed | Varies (e.g., 1/15s to 1s); set last | Adjust exposure slider or use software |
| Focus | Manual focus using live view zoom | Tap to focus on the room’s main subject |
| File Format | RAW | RAW or highest-quality JPEG |
| Key Accessory | Sturdy Tripod | Tripod with a phone mount |
| White Balance | Set manually (e.g., Kelvin) or use Auto | Auto White Balance (AWB) is usually best |
These are great starting points. You’ll need to adjust based on the specific lighting in each room, but this will get you 90% of the way there.
One of your phone’s most powerful built-in tools is HDR (High Dynamic Range). When you’re shooting a room with a bright window, the camera often struggles to capture both the view outside and the room’s interior details at the same time. HDR solves this by quickly taking several pictures at different exposures and merging them into one perfectly balanced photo. Make sure this is turned on when you’re dealing with tricky lighting—it can make all the difference.
Using Light and Composition to Create Ambiance
If you want to separate a decent snapshot from a breathtaking photograph, it all comes down to two things: light and composition. These aren’t just technical terms; they’re the tools you use to build a mood, tell a story, and make a two-dimensional image feel like a space someone can actually walk into. Getting them right is the key to creating home interior pictures that truly sell.
I’ve learned over the years that great lighting is everything. Before I even think about my camera, my first step is always to track the sun’s path across the property. East-facing rooms are simply magical in the morning, while west-facing rooms practically glow with warm, golden light late in the afternoon. Scheduling your shoot around this natural light show costs you nothing but can make your photos look like a million bucks.
Mastering Natural and Artificial Light
When it’s time to shoot, throw open every blind, curtain, and shutter you can find. Your goal is to flood the space with as much soft, indirect sunlight as possible. One of the biggest mistakes I see beginners make is leaving all the interior lights on. Unless you’re trying to feature a stunning designer chandelier, just turn them off. Mixing the warm, yellow tones of artificial bulbs with the cool, blue tones of daylight creates strange color casts that look unprofessional and are a huge pain to correct in post-processing.
Of course, sometimes natural light just won’t cut it, especially in windowless bathrooms or long hallways. This is where you need to bring in your own light source. But please, step away from the harsh on-camera flash. Instead, grab an off-camera speedlight.
The real pro trick is to bounce the flash. Aim it at a neutral-colored ceiling or an adjacent wall. This technique diffuses the light, making it soft and even, mimicking the way natural light fills a room. It brightens up dark corners and gets rid of those harsh, ugly shadows.
This simple move gives you a bright, airy look without any of the tell-tale signs of a flash. For those really tricky shots—think a dark living room with a wall of bright windows—you might need something more advanced, like High Dynamic Range photography. We actually wrote a complete guide on HDR for real estate photography that breaks down how to blend multiple exposures for one perfectly balanced image.
Guiding the Viewer with Composition
Once your lighting is perfect, it’s time to think about composition. This is simply the art of arranging everything in your frame to create an image that’s both beautiful and easy to understand. There are plenty of “rules” out there, but a few have proven to be fundamental for incredible home interior pictures.
The Rule of Thirds is a classic for a reason—it just works. Picture your screen divided by a 3x3 grid. By placing your main subject along one of those lines or at an intersection, instead of dead-center, you create a much more dynamic and visually engaging photo.
You should also look for leading lines. These are natural lines within the room that you can use to guide the viewer’s eye. Think about the edge of a hardwood floor, the line of a long kitchen island, or a vaulted ceiling beam. Use them to draw attention to a focal point, like a beautiful view or a cozy fireplace.
Finally, the angle you shoot from completely changes the feel of the photo.
-
Camera Height: Don’t shoot from your eye level; it often makes a room feel like it’s tilting away. I’ve found that a lower height, somewhere around 40-50 inches from the floor (think waist or chest high), gives a much more natural and inviting perspective. It feels like you’re really in the space.
-
Keep it Level: Always make sure your camera is perfectly level, both horizontally and vertically. Crooked lines are distracting and scream “amateur.” This is where a tripod with a built-in bubble level becomes your absolute best friend.
Capturing Trending Design Elements
Strong composition also means knowing what to focus on. Right now, one of the biggest trends is biophilic design—the practice of connecting a home with the natural world. This movement has gained serious momentum as people look to move away from sterile, minimalist designs and embrace earthy textures and nature-infused spaces.
In fact, recent industry reports, like those from 1stDibs, highlight this shift. Current surveys show that 58% of designers expect biophilic design to keep growing in popularity. Even more importantly, properties that feature these nature-connected spaces can sell up to 10-15% faster. So, when you walk into a room and see large plants, beautiful wood tones, or a seamless indoor-outdoor flow, make that the hero of your shot.
From Manual Edits to AI-Powered Enhancements
Getting the shot is one thing. Turning it into a breathtaking home interior picture that stops the scroll is another. That’s where the real work—and the real magic—begins in post-processing. This is how you transform a good photo into a visual that genuinely captivates buyers. The workflow I’ve honed over the years starts with the essential manual tweaks and then moves into some seriously powerful AI solutions.
First things first, let’s talk about the foundational edits. I consider these non-negotiable for any interior photo worth its salt. You can get these done with software like Adobe Lightroom, but even free tools can handle the basics.
Your absolute first priority is white balance correction. Your goal is simple: make the whites look white. Get this right, and all the other colors in the room fall into place. If the walls have a yellow or blue cast, the whole photo just feels off. From there, I’ll adjust the exposure to brighten things up without blowing out the highlights or crushing the shadows. A final, subtle touch of sharpening makes details like wood grain or fabric textures really pop.
The Leap to AI-Driven Editing
Once you’ve nailed the basics, it’s time to see what modern tech can really do. AI editing isn’t about faking it; it’s about solving frustrating problems in seconds that used to take me hours of painstaking work in Photoshop. This is the secret weapon pros use to get an edge.
Think about the entire photography process, from light and camera angle to the final composition.

As you can see, every great image starts with solid camera work. But the editing phase is where you truly perfect it, and AI is what adds that final layer of polish and solves those nagging real-world problems.
Platforms like BrightShot, for instance, have made some of my most tedious tasks disappear with a single click. We’ve all been there: you get the perfect shot, only to notice a stray electrical cord or the dog’s water bowl in the corner. Instead of battling the clone stamp tool, AI-powered intelligent decluttering can make those objects vanish as if they were never there.
AI Enhancements That Save Time and Money
This technology goes way beyond just cleaning things up. Some of the most valuable AI edits can completely change the mood and appeal of your home interior pictures.
- Day-to-Dusk Conversion: This is a game-changer. Take a standard daytime exterior and, with one click, turn it into a dramatic twilight shot with glowing windows and a beautiful sunset. It instantly adds a premium feel to a listing.
- Sky and Lawn Replacement: Stuck shooting on an overcast day? It happens. AI can swap that dull, gray sky for a perfect blue one. It can also fix a patchy lawn, turning it into a lush, green carpet.
- Color and Tone Adjustments: Experiment with different moods for a room—from bright and airy to warm and cozy—using AI-driven style suggestions.
These aren’t just cosmetic changes. This is about taking control of the narrative. You get to present every single property in its absolute best light, no matter the weather or small imperfections on shoot day.
There’s a reason this technology has been adopted so quickly. The use of AI in home photography is exploding, with projections showing nearly everyone will be using it by 2027. For agents and photographers, the ROI is undeniable. AI-enhanced images have been shown to generate 47% more leads and help properties sell 32% faster.
Even better, these tools can slash editing costs by up to 90% and cut turnaround time from days to mere seconds. Our article on https://bright-shot.com/blog/ai-real-estate-photo-editing/ dives deeper into these possibilities with more real-world examples.
And if you want to explore the creative side, checking out the top AI image models can give you a glimpse into what’s possible beyond standard edits. By combining solid, fundamental editing skills with smart automation, you can produce incredible images, faster and more efficiently than ever before.
Turning Empty Spaces into Homes with Virtual Staging

You’ve captured the perfect shots of a clean, vacant property. Now what? The truth is, an empty room often leaves buyers feeling cold and uninspired. This is where virtual staging becomes your most powerful tool, turning that blank canvas into a compelling vision of a future home.
Most buyers just can’t see past the emptiness. They walk into a vacant space and struggle to imagine where their couch would go or how a room could feel cozy. Virtual staging closes that “imagination gap” by showing them exactly what’s possible, creating an emotional connection that a bare room never could.
From Empty Canvas to Aspirational Home
Getting this done is simpler than you might think. With a tool like BrightShot, you can transform a vacant listing in just a few minutes. All you need to do is upload your high-quality photo of the empty room and start exploring different design styles.
You can pick from curated aesthetics that are known to resonate with specific buyers. Some of the most popular choices I see working well right now include:
- Modern Farmhouse: A perfect blend of rustic comfort and clean, contemporary design. Think warm woods, neutral colors, and inviting textures.
- Scandinavian: This style is all about minimalism and function. It uses soft tones and a mix of textures to make a space feel bright and welcoming without being cluttered.
- Industrial: Great for urban lofts and modern builds, this style embraces raw materials like exposed brick and metal for a chic, edgy look.
Once you’ve picked a style, AI places photorealistic furniture and decor right into your photo. Crucially, everything is added to scale, so the final image is a true-to-life representation. This isn’t just about digitally dropping in a sofa; it’s about crafting a believable and aspirational lifestyle.
Showcasing Potential with Virtual Renovations
But virtual styling isn’t just for furnishing empty rooms. It’s also an incredible way to show a property’s hidden potential by tackling cosmetic issues before a buyer can even object.
Think about that room with the hopelessly dated wallpaper or an aggressive paint color. Instead of letting a buyer fixate on the work involved, you can present them with a photo showing the space with a fresh, modern coat of paint.
By visually demonstrating the ‘after’ without any of the cost or labor of a real renovation, you help buyers see value instead of problems. This is how you transform a listing’s perceived flaws into selling points.
Some of the most effective virtual renovations I’ve used are:
- Changing wall colors
- Updating flooring from old carpet to modern hardwood
- Digitally refinishing kitchen cabinets
When you need to elevate the look, using dedicated AI product photos for home decor can also make a huge difference, turning an empty room into a space that looks professionally and convincingly staged.
The Business Case for Virtual Staging
The results speak for themselves. The global interior design market hit $136.1 billion in 2023 and is on track to reach $228 billion by 2033. For those of us in real estate, this points to a massive opportunity. Properties marketed with professionally enhanced photos—using AI for virtual staging and lighting corrections—don’t just look better; they can generate up to 30% more inquiries and help you secure more premium listings.
At the end of the day, tools like this allow you to offer a superior service. By showing a home at its absolute best, you not only attract a wider pool of serious buyers but also give yourself a powerful edge to win more high-end clients. It’s proof that you have the strategy and the tech to market any property effectively.
Answering Your Burning Questions About Home Interior Photos
If you’ve spent any time shooting real estate, you know that a few key questions come up again and again. Whether you’re a new agent trying to get your own shots or a seasoned pro looking to refine your process, we all hit the same roadblocks.
Let’s get straight to it. Here are the answers to the questions I hear most often out in the field.
What’s the Single Biggest Mistake I Can Make?
Easy. Using the home’s built-in lights. Flipping on that overhead fan light or the sconces in the dining room is the fastest way to ruin a perfectly good shot.
You’ll get a nasty yellow or orange color cast, harsh shadows in all the wrong places, and an overall vibe that just screams “amateur.” It makes a space feel dated and gloomy, even when it isn’t.
I’ll say it again for the people in the back: turn off all the interior lights. Your first move in any room should be to open every blind and curtain to let the natural light pour in. If a room is still too dark, that’s when you bring in an off-camera flash and bounce it off a white ceiling or wall. This creates a soft, beautiful light that looks completely natural.
Fixing this one habit will instantly elevate your photos more than any other single change.
How Many Pictures Should a Listing Actually Have?
There’s no law here, but after years of looking at the data and talking with buyers, the sweet spot is 25 to 35 photos. That’s enough to give a comprehensive tour without causing “swipe fatigue.”
Fall short of 20 photos, and buyers will assume you’re hiding something. Go over 40, and you risk losing their attention with repetitive angles. You want to tell a story, guiding them through the home logically.
A solid shot list usually breaks down like this:
- Exterior: 2-3 shots are essential. Get the front curb appeal, the backyard, and maybe a detail shot of the patio or deck.
- Main Living Areas: Plan for 2-3 shots of the living room and kitchen. Capture different angles.
- Dining Area: 1-2 photos usually does the trick.
- Primary Suite: Give it the attention it deserves with 2 shots of the bedroom and 1-2 of the bathroom.
- Other Rooms: One great shot for each secondary bedroom, bathroom, home office, or bonus room is plenty.
- The “Wow” Factors: Dedicate a shot to anything special—a cozy fireplace, a stunning view, or a custom built-in.
Think of it as a virtual walkthrough. Your photo gallery should flow from one space to the next, just like a real-life showing.
Is an Empty Room Really That Bad? Is Virtual Staging Worth It?
Yes, an empty room is that bad. And yes, virtual staging is almost always worth it. It might seem like you’re offering a “blank canvas,” but the reality is that most people can’t visualize a space on their own. In fact, studies show over 80% of buyers struggle to see the potential in an empty room.
Vacant rooms often feel cold, sterile, and confusingly small in photos. Buyers can’t figure out if their king-sized bed or sectional sofa will fit.
Virtual staging completely solves this problem. It doesn’t just add furniture; it defines the room’s purpose, shows scale, and adds a layer of warmth that helps a buyer emotionally connect. They start picturing their own life in that home. Thanks to modern AI tools, you can now get photorealistic staging for a tiny fraction of the cost and headache of physical staging. It’s a no-brainer.
Ready to see this in action? BrightShot gives you the power to turn your photos into captivating, professional visuals in just a few clicks. From AI-powered virtual staging to flawless day-to-dusk edits, our tools are built to help you attract more buyers and sell homes faster. Give it a try and see what you’ve been missing.